PRISM User Guide

Adding and Curating Interactions

Comprehensive documentation for contributing to the research infrastructure mapping initiative

1. Understanding Tool Interactions

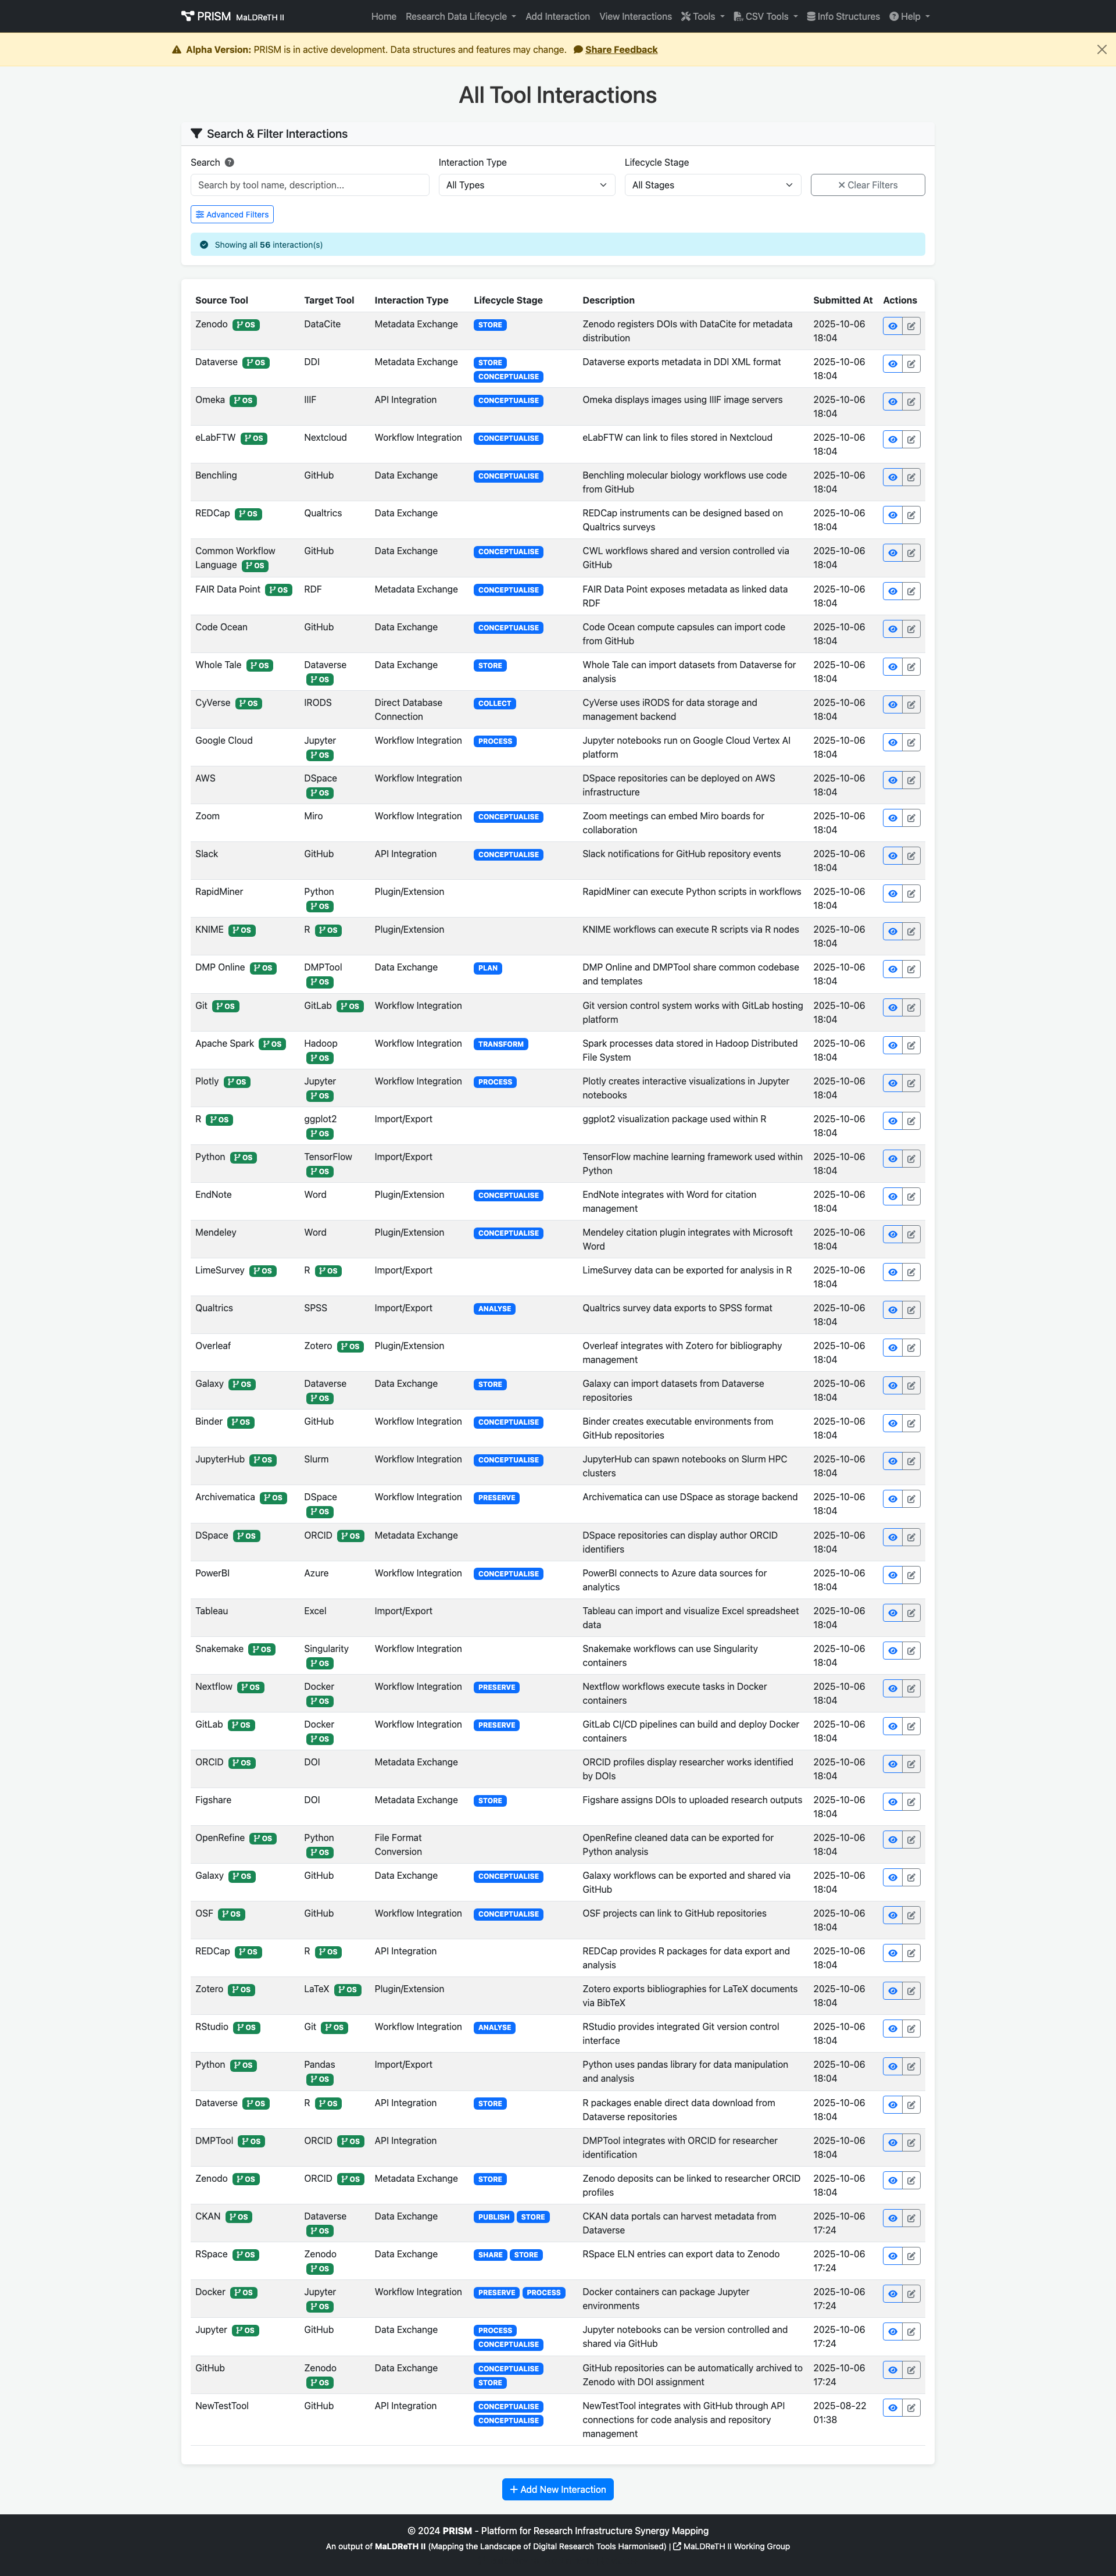
What is a Tool Interaction?

A tool interaction in PRISM represents a connection or integration between two research tools in the digital research ecosystem. Interactions enable data flow, functionality enhancement, or workflow integration across the research data lifecycle.
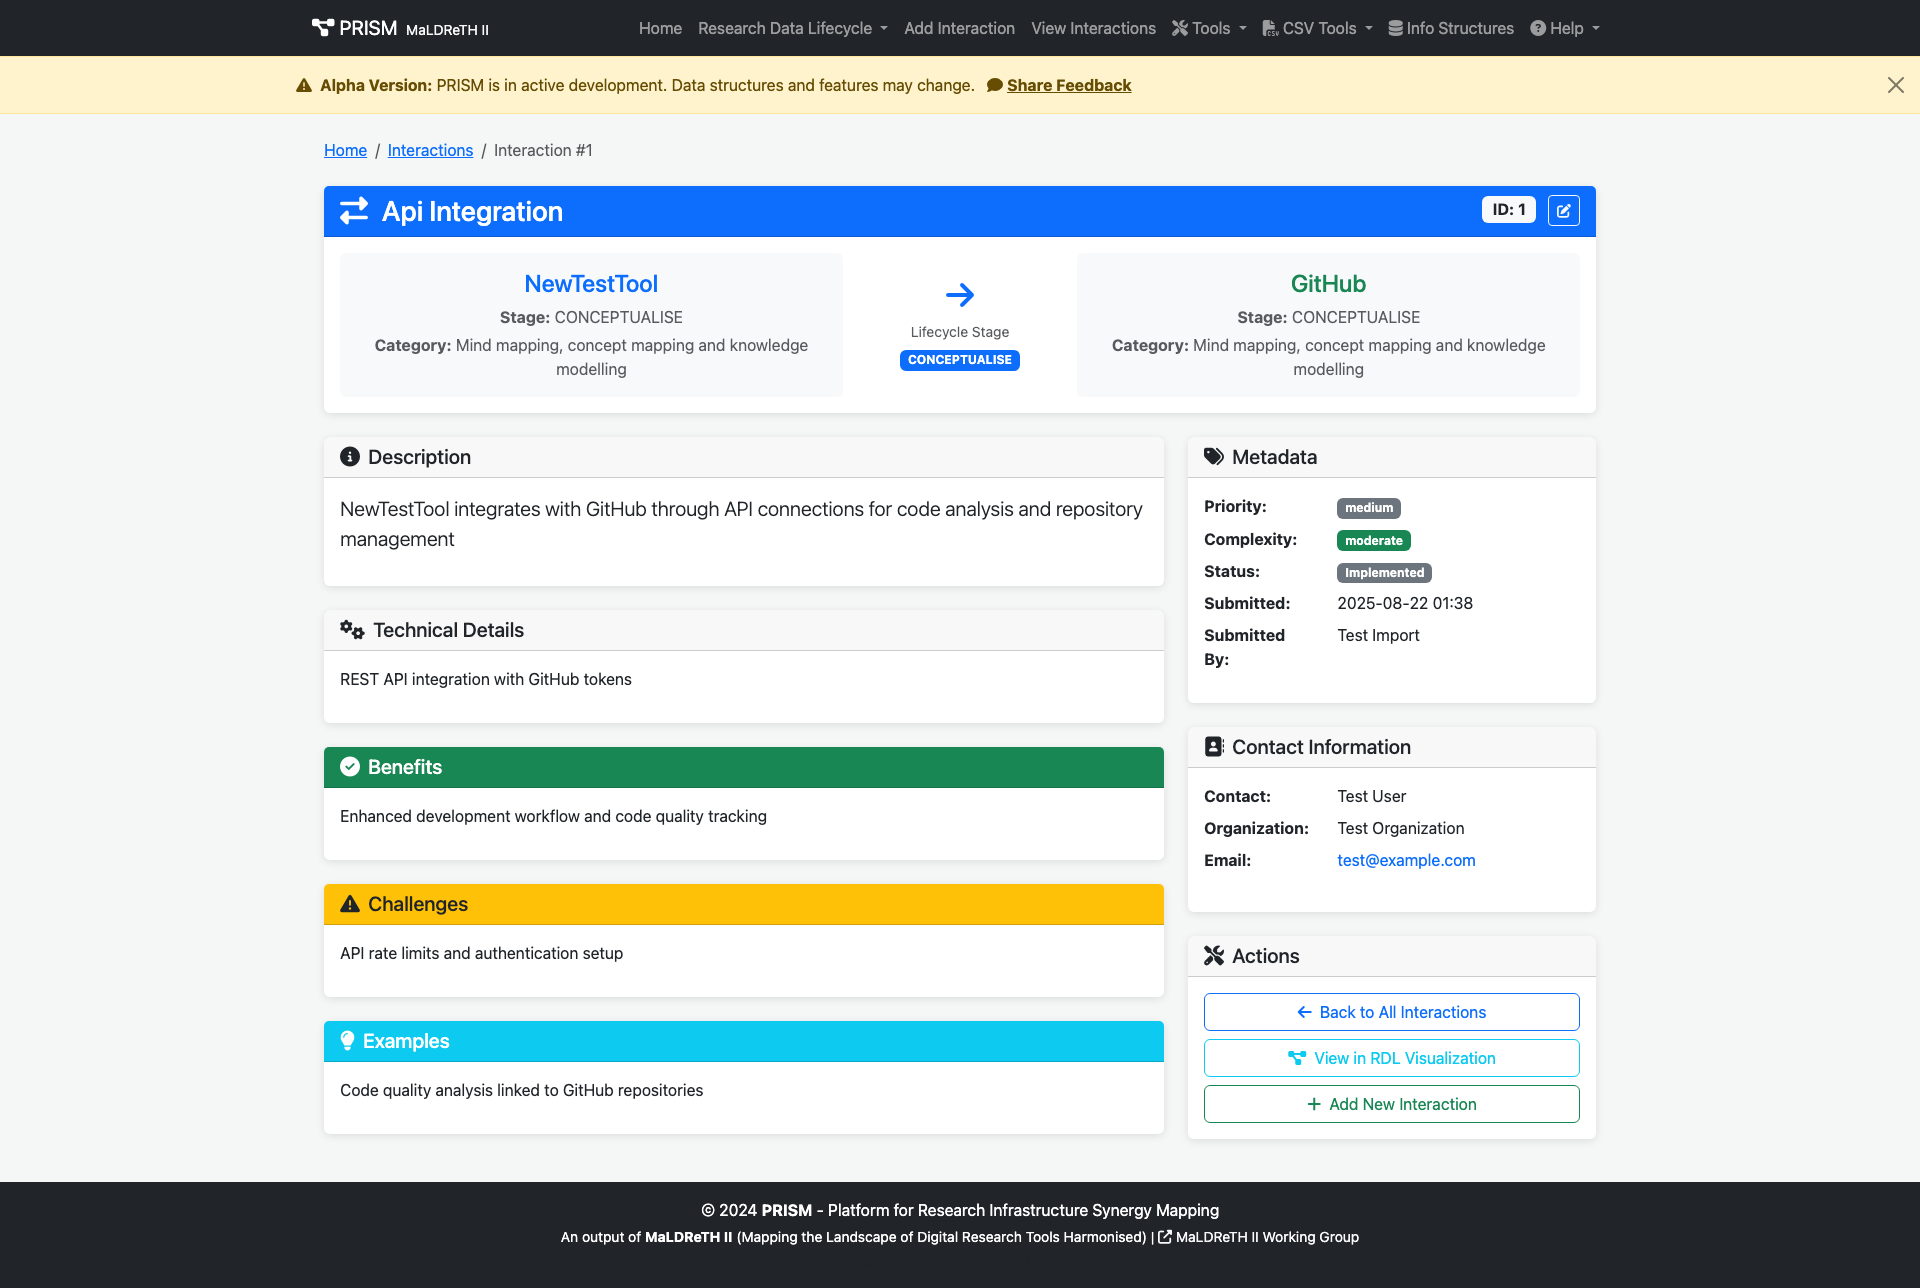
Source Tool

Initiates or provides data/functionality

Interaction Type

How the tools connect

Target Tool

Receives data/functionality

Example Interaction

GitHub Zenodo

  • Type: Data Exchange
  • Stage: PRESERVE
  • Description: GitHub repositories are automatically archived to Zenodo with DOI assignment, creating permanent records of research software.
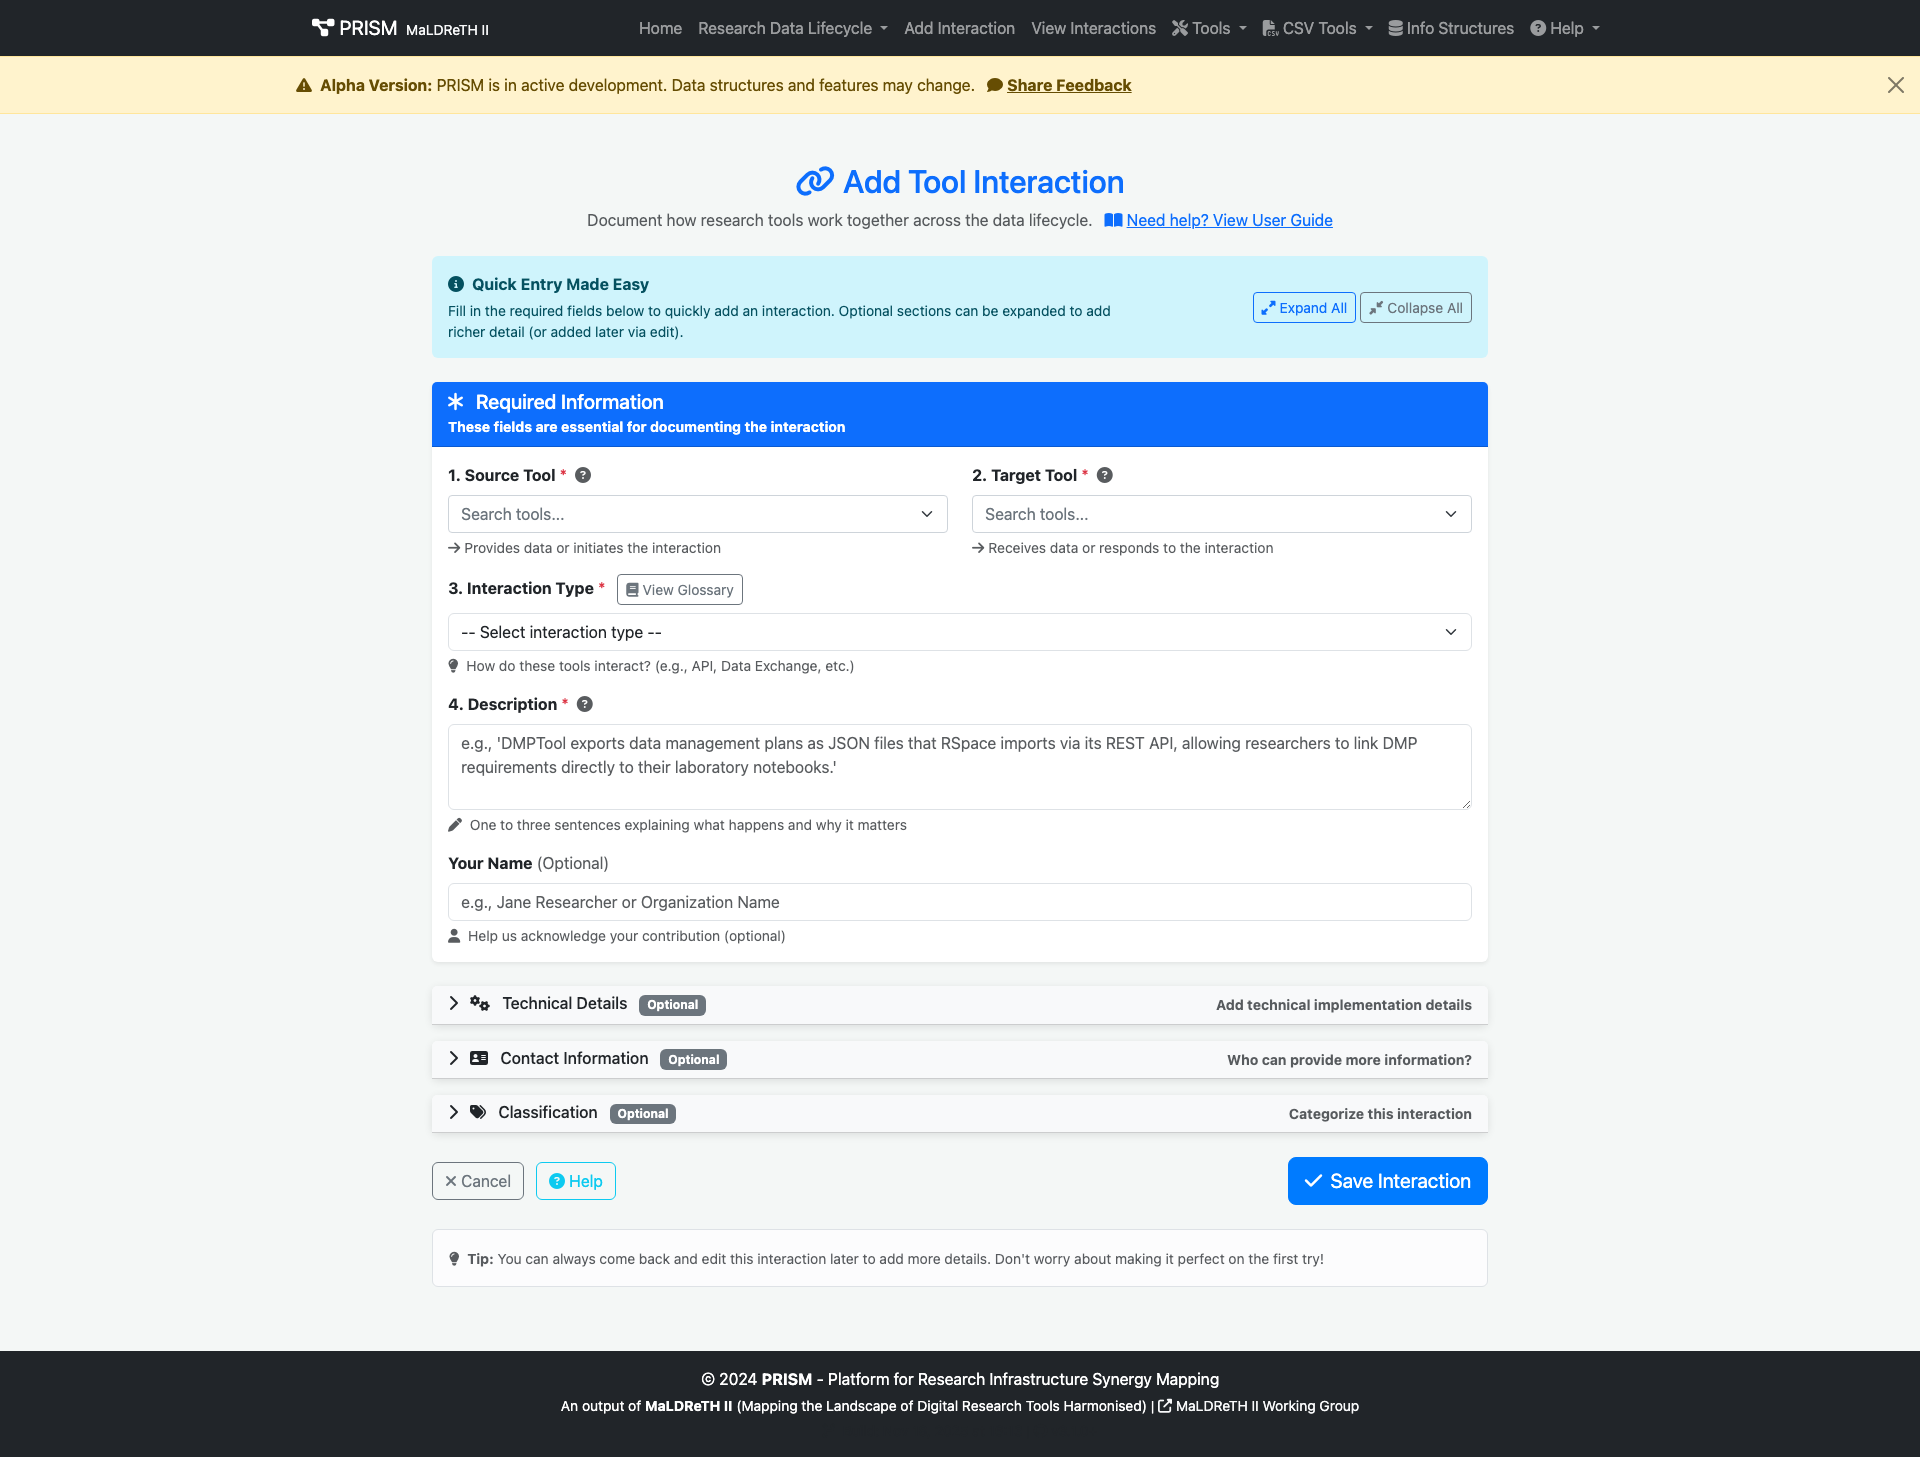
Components of an Interaction

Every interaction consists of essential elements:

  1. Source Tool - The tool that initiates the connection
  2. Target Tool - The tool that receives or responds
  3. Interaction Type - The mechanism of connection (API, data exchange, etc.)
  4. Description - What happens and why it matters
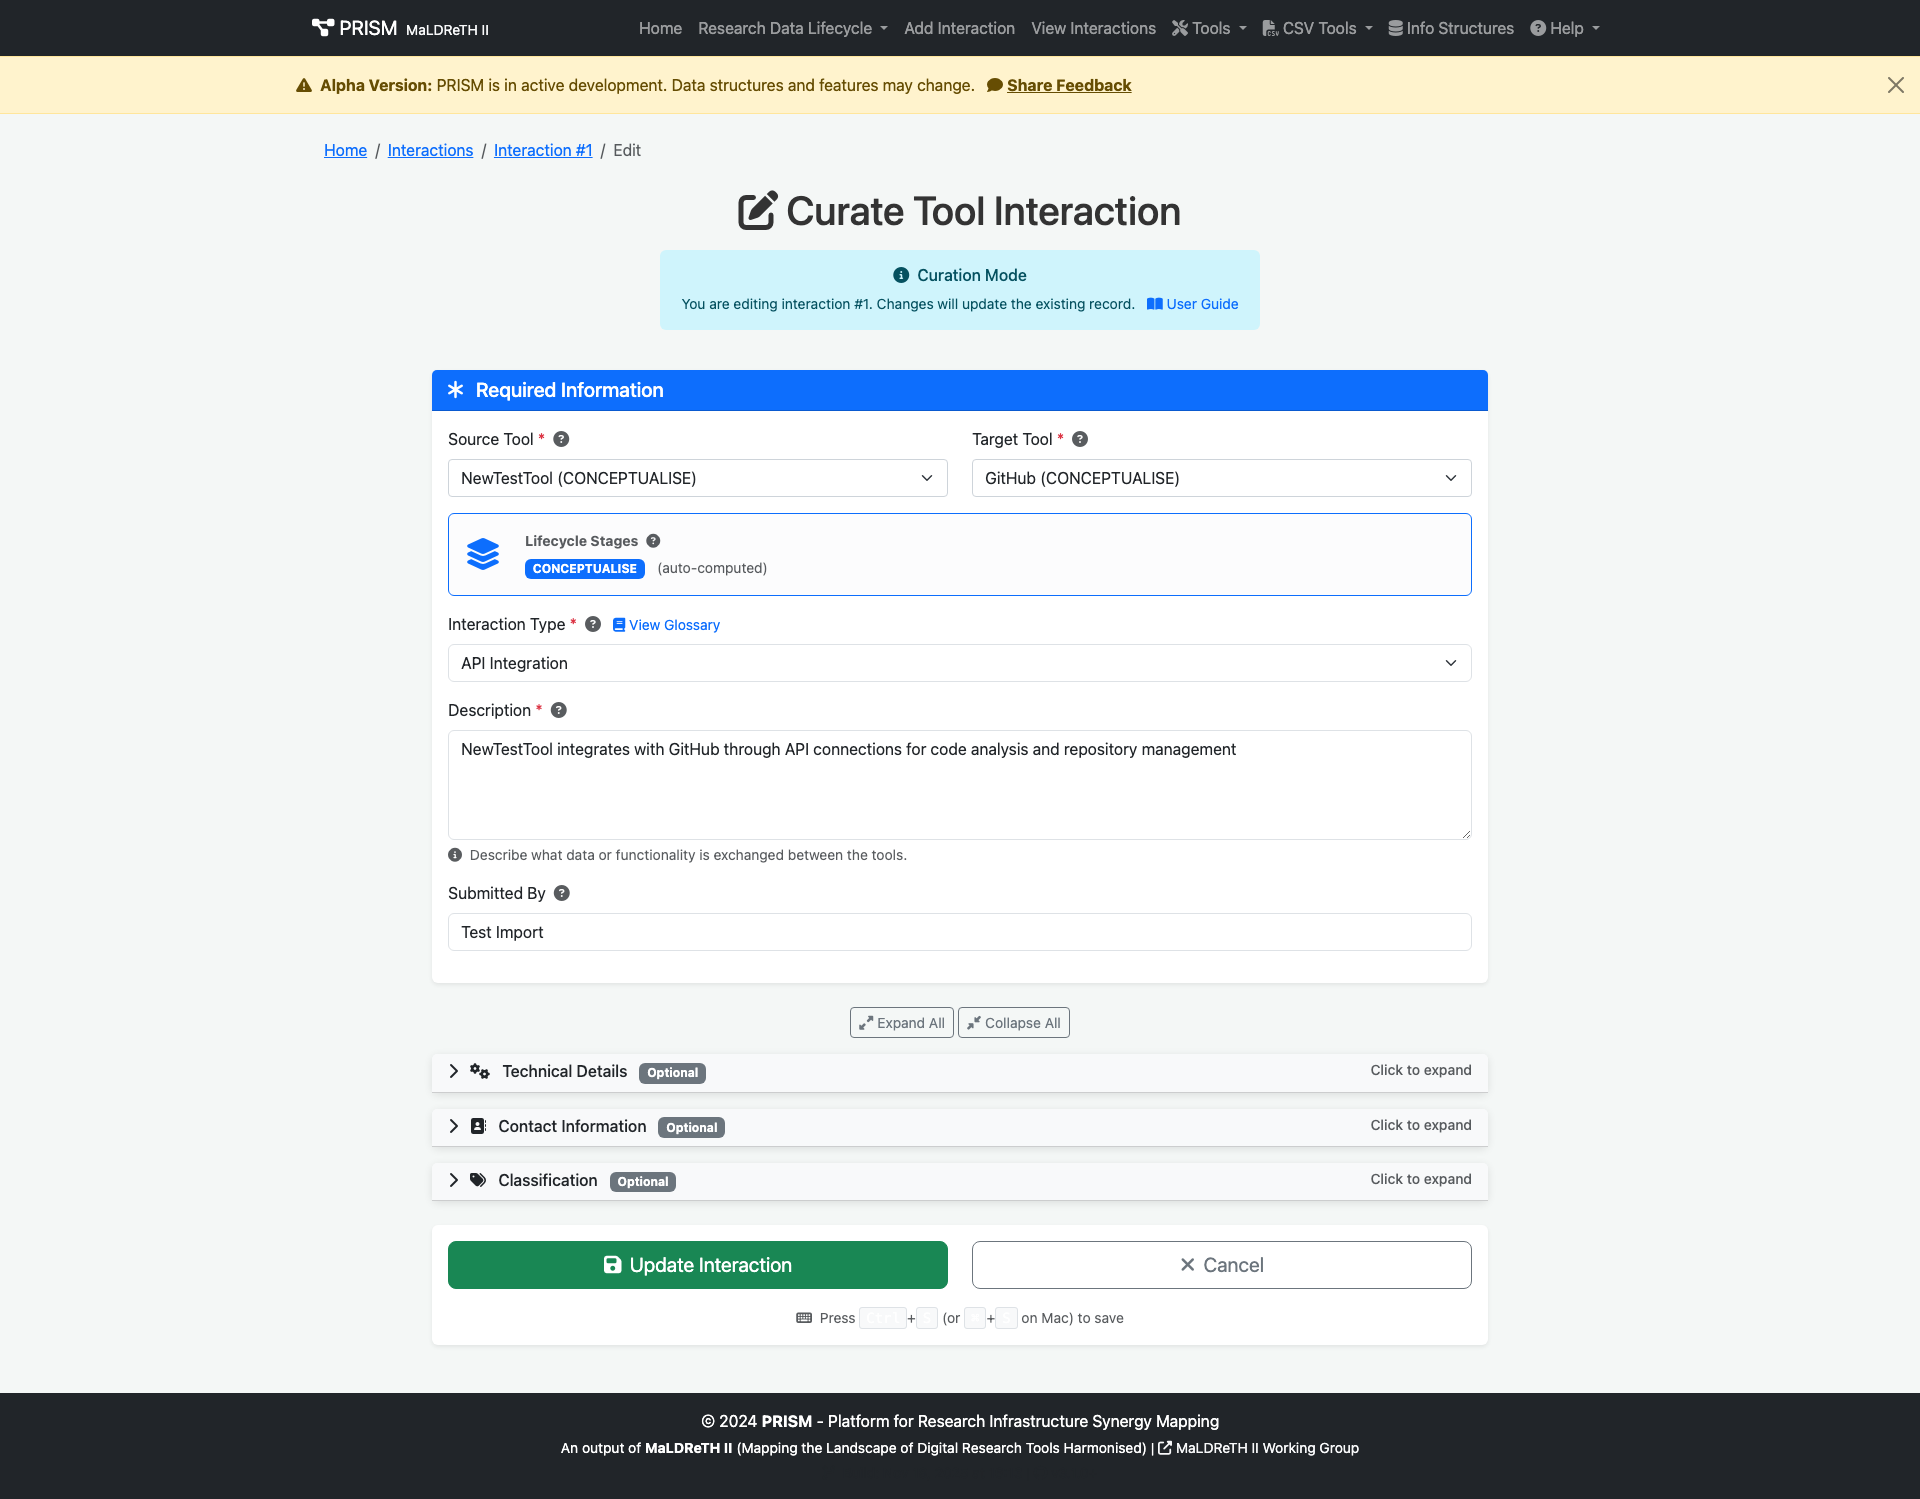
  5. Lifecycle Stages - Auto-computed from the source and target tools' assigned stages
Automatic Lifecycle Stage Detection

As of November 2025, PRISM automatically determines lifecycle stages from the selected tools. When you choose your source and target tools, their lifecycle stages are displayed automatically—no manual selection needed!

2. Before You Start

Prerequisites

Account Access

Access to the PRISM web interface

Knowledge

Familiarity with the tools you're documenting

Reference Materials

Tool documentation, examples, technical specs

Understanding

Review the glossary first

Familiarize Yourself

Before adding interactions, explore:

1 Tool Catalog - View all 72+ research tools in PRISM
View Tools
2 Glossary - Understand terminology and interaction types
View Glossary
3 Existing Interactions - See examples of well-documented interactions
View Interactions
Interaction List View

Interaction list showing lifecycle stage badges

4 Visualizations - Understand how interactions are displayed
View Visualization

3. Adding Interactions via Web Form

The web form is ideal for adding single, well-researched interactions with detailed information.

Step-by-Step Guide

  1. Go to PRISM homepage
  2. Click "Add Interaction" in the navigation menu
  3. Or navigate directly to /add-interaction
Go to Add Interaction
Add Interaction Form

Click image to view full size

Source Tool:
  • Select the tool that initiates the interaction
  • Use the searchable dropdown (type to filter)
  • Each tool shows its lifecycle stage in parentheses
Target Tool:
  • Select the tool that receives data/functionality
  • Cannot be the same as source tool
  • Consider the direction of data/functionality flow
Tip: The order matters! Think about causality:

GitHub → Zenodo (GitHub pushes to Zenodo)
Zenodo → GitHub (backwards)

Lifecycle Stages (Auto-Computed)

After selecting source and target tools, PRISM automatically displays the relevant lifecycle stages:

How it works:

  • Each tool in PRISM is assigned to one or more lifecycle stages
  • When you select tools, their stages are automatically shown
  • If both tools are in the same stage: ANALYSE
  • If tools are in different stages: COLLECT ANALYSE

No manual selection needed! The form will show you the computed stages.

Interaction Type (Required)

Choose from 11 predefined types:

  • API Integration
  • Data Exchange
  • Metadata Exchange
  • File Format Conversion
  • Workflow Integration
  • Plugin/Extension
  • Direct Database Connection
  • Web Service
  • Command Line Interface
  • Import/Export
  • Other

See the glossary for detailed descriptions of each type.

Description (Required)

Write 1-3 sentences explaining:

  • What happens during the interaction
  • Why it's useful for researchers
  • The benefit or outcome
Good Example:

"Zenodo automatically links publications and datasets to ORCID profiles, enabling comprehensive research output tracking and attribution across the scholarly ecosystem."

While optional, these fields greatly enhance interaction quality and are now organized in collapsible sections:

Progressive Disclosure: The form uses collapsible sections to keep required fields visible while hiding optional details until needed. Click "Expand All" to see all fields at once!

Field What to Include
Technical Details Implementation specifics (REST API, OAuth 2.0, etc.)
Benefits Advantages for researchers or workflows
Challenges Known limitations or difficulties
Examples Real-world use cases or scenarios

Before Submitting
  1. Review all fields for accuracy
  2. Check that source/target tools are in correct order
  3. Verify interaction type matches the connection
  4. Check the auto-computed lifecycle stages look correct
  5. Proofread your description

Once ready, click "Add Interaction" to submit.

You'll be redirected to the interaction detail page with a success message!

Keyboard Shortcut: Press Ctrl+S (or +S on Mac) to save your interaction quickly!

4. Bulk Import via CSV

CSV import is ideal for adding multiple interactions at once, especially when working from spreadsheets or external sources.

Step 1: Download Template

Get the correct CSV structure:

Download CSV Template
Step 2: Prepare Data

Fill in your interaction data:

View CSV Structure
CSV Structure
Required Columns:
Source Tool, Target Tool, Interaction Type, Lifecycle Stage
Optional Columns:
Description, Technical Details, Benefits, Challenges, Examples,
Contact Person, Organization, Email, Priority, Complexity, Status, Submitted By
Example CSV Content:
Source Tool,Target Tool,Interaction Type,Lifecycle Stage,Description,Priority,Status
GitHub,Zenodo,Data Exchange,PRESERVE,"GitHub repositories automatically archived to Zenodo with DOI.",medium,implemented
DMPTool,RSpace,API Integration,PLAN,"DMPTool integrates with RSpace for data management planning.",high,pilot
REDCap,R,Data Exchange,ANALYSE,"REDCap exports directly to R for statistical analysis.",high,implemented
Important Validation Requirements
  • Tool Names: Must exactly match existing tools in PRISM (case-sensitive)
  • Interaction Types: Must be from the predefined list
  • Lifecycle Stages: Must match MaLDReTH stages
  • CSV Format: UTF-8 encoding, comma-separated, quoted fields if containing commas
Step 3: Upload and Review
  1. Navigate to the CSV upload page
  2. Choose your file or drag-and-drop
  3. Click "Upload and Process"
  4. Review the results page for success/errors
Upload CSV Now
Understanding Results:
Success

New interactions added to database

Duplicates

Interactions already exist (skipped)

Errors

Issues with data that need correction

5. Curating Existing Interactions

Curation involves reviewing, correcting, and enriching existing interaction data to maintain quality and completeness.

When to Curate
Incomplete Data

Missing technical details or examples

Outdated Information

Status changes, deprecated integrations

Improved Understanding

Better descriptions based on new knowledge

Error Correction

Fix typos, wrong tools, incorrect stages

How to Curate
1 Find the Interaction
Browse, search, or use direct URL if you know the ID
Browse Interactions
2 Review Current Data
Read the full record and identify what needs updating
Interaction Detail View

Detail view showing auto-computed lifecycle stages with directional arrows

3 Edit the Interaction
Click the "Edit" button (✏️ icon) on the interaction detail page
Edit Interaction Form

Edit form with auto-computed lifecycle stages and progressive disclosure

4 Make Updates
Modify fields, add missing information, correct errors
5 Save Changes
Review your modifications and click "Save Changes"
Best Practice: Add a note in the description about what you changed and why, if the change is significant.

6. Best Practices

Writing Quality Descriptions
DO:
  • Focus on what the interaction enables for researchers
  • Use clear, concise language (1-3 sentences)
  • Explain the "why" not just the "what"
  • Include context about research workflows
DON'T:
  • Use overly technical jargon without explanation
  • Write vague descriptions ("these tools work together")
  • Include marketing language or superlatives
  • Copy-paste from tool websites without context
Good Example:

"Jupyter notebooks can be containerized using Docker to ensure reproducible computational environments across different systems and platforms, enabling researchers to share analysis workflows that run identically regardless of local setup."

Poor Example:

"Jupyter and Docker work together. This is useful."

Understanding Auto-Computed Lifecycle Stages

Lifecycle stages are now automatically determined from the tools you select:

How It Works
  • Each tool in PRISM is assigned to a lifecycle stage (e.g., GitHub → PLAN, Zenodo → PRESERVE)
  • When you create an interaction, the form displays the stages from both tools
  • Same stage interactions show one badge: ANALYSE
  • Cross-stage interactions show both: COLLECT PRESERVE
Stage Common Tools
CONCEPTUALISE DMPTool, Argos, Research planning tools
COLLECT REDCap, Qualtrics, Lab instruments, sensors
ANALYSE R, Python, Jupyter, SPSS, statistical tools
PRESERVE Zenodo, figshare, Dryad, institutional repositories
PUBLISH DataCite, Crossref, article submission systems
Tip: If the displayed lifecycle stages don't seem right for an interaction, the tools themselves may need stage reassignment. Contact the PRISM team to suggest tool stage updates.

7. Common Scenarios

Question: GitHub and Zenodo have bidirectional integration. Should I create two interactions?

Answer: Yes, create separate interactions if the directionality matters:

  • GitHub → Zenodo (archiving repositories)
  • Zenodo → GitHub (linking back to source code)

Each has different use cases and technical implementations.

Question: ORCID connects to Zenodo, figshare, DataCite, and many others. How should I document this?

Answer: Create separate interactions for each connection:

  • ORCID → Zenodo (authentication and profile linking)
  • ORCID → figshare (researcher identification)
  • ORCID → DataCite (persistent identifiers)

Each interaction may have different technical details and use cases.

Question: I want to document an interaction, but one of the tools isn't in PRISM yet.

Answer:

  1. Check tools list to confirm the tool is truly missing
  2. Check for alternate tool names or spellings
  3. Use Add Tool to add it yourself
  4. For CSV imports, the validation will identify missing tools

Question: Can I document interactions that are planned but not yet implemented?

Answer: Yes! Set the Status field appropriately:

  • Proposed: Conceptual or planning phase
  • Pilot: In testing or limited rollout
  • Implemented: Fully operational

This helps track the evolution of the research infrastructure landscape.

Question: Should I document interactions that no longer work?

Answer: Yes, for historical context:

  1. Keep the interaction record
  2. Set Status to Deprecated
  3. Update description to note "No longer supported as of [date]"
  4. Explain in challenges: "Service discontinued" or "Replaced by [new tool]"

This helps researchers understand ecosystem evolution.

8. Quality Guidelines

Minimum Standards

Every interaction should have:

  • Correct source and target tools in proper order
  • Appropriate interaction type selection
  • Accurate lifecycle stage assignment
  • Clear description (minimum 1 sentence)
  • Appropriate status indicator
Enhanced Quality

For high-quality, curated interactions:

  • Technical details with implementation specifics
  • Benefits clearly articulated
  • Known challenges or limitations documented
  • At least one concrete example provided
  • Priority and complexity assessed
  • Contact information for verification
Red Flags to Avoid
  • Generic descriptions: "Tool A and Tool B integrate"
  • Wrong directionality: Source/target reversed
  • Incorrect stages: Choosing ANALYSE for a preservation tool
  • Missing context: Technical jargon without explanation
  • Duplicate entries: Same interaction documented multiple times
  • Outdated status: Marking deprecated integrations as "Implemented"
Verification Tips

Before finalizing an interaction:

  1. Tool Documentation: Check official docs to verify the interaction exists
  2. User Experience: Have you or someone you know used this integration?
  3. Technical Accuracy: Are the technical details correct?
  4. Current Status: Is the integration still active and supported?
  5. Peer Review: Have a colleague review complex or critical interactions

9. Troubleshooting

CSV Upload Issues
Problem Solution
"Tool 'X' not found in database" Check exact spelling at tools list or add the tool first
"Invalid interaction type" Must use exact names from predefined list (check glossary)
"Duplicate interaction detected" Interaction already exists; use curation interface to update
"CSV encoding error" Save CSV as UTF-8 encoding or remove special characters
Web Form Issues
Tool dropdown not loading
  • Enable JavaScript in your browser
  • Try a different browser (Chrome, Firefox recommended)
  • Clear browser cache and reload
Form submission fails
  • Check all required fields are completed (marked with *)
  • Ensure source and target tools are different
  • Check browser console for JavaScript errors
Getting Help

If you encounter issues not covered here:

10. Quick Reference Card

Adding an Interaction
  1. Go to /interaction/add
  2. Select Source Tool (initiator)
  3. Select Target Tool (receiver)
  4. Review Auto-Computed Stages 🎯
  5. Choose Interaction Type
  6. Write Description (required)
  7. Expand optional sections if needed
  8. Submit (or press Ctrl/Cmd+S)
Add Interaction
CSV Import
  1. Download template
  2. Fill in your data
  3. Validate tool names and types
  4. Upload and review results
Upload CSV
Curating
  1. Find interaction
  2. Click Edit (✏️)
  3. Update fields as needed
  4. Save changes
View Interactions

Ready to Contribute?

Join the MaLDReTH II community in mapping the research infrastructure landscape